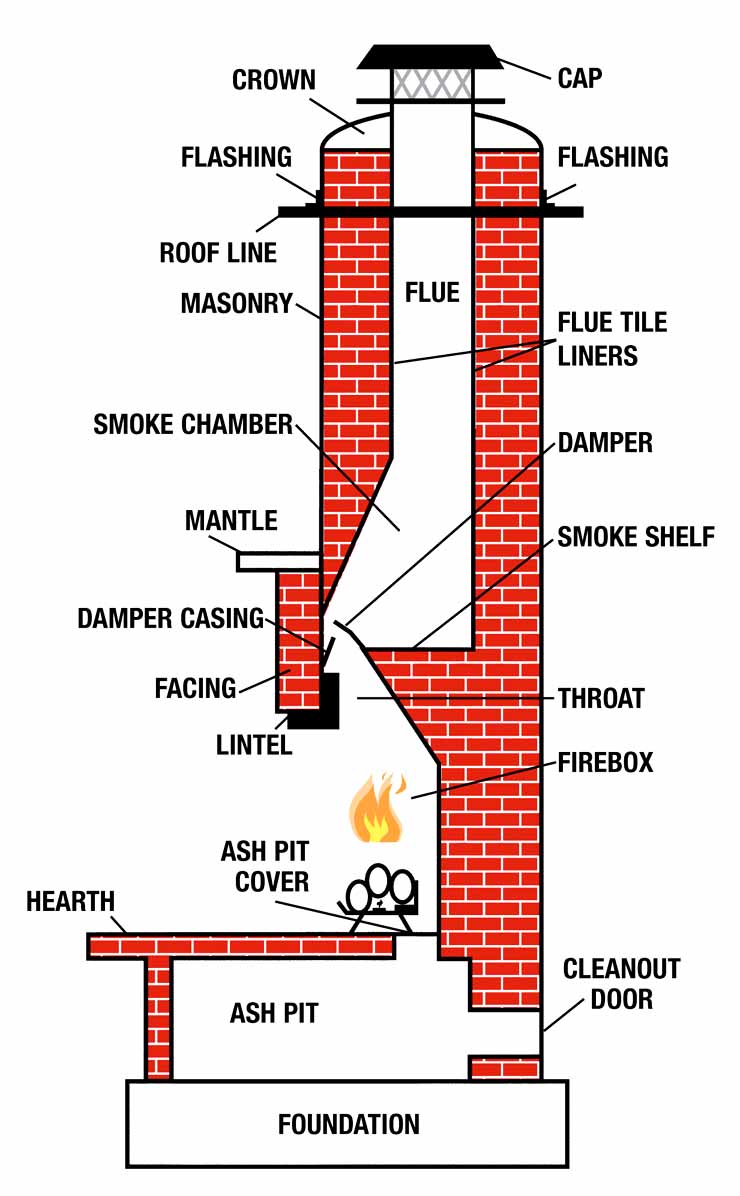
 Chimney leaks are hard to pinpoint. They can come from nearly anywhere on a chimney. Here are four common sources of leaks. Once you do find the source, you may need a fireplace pro to fix it. Some areas that you can check for finding leaks in the chimney are namely in the mud cap, or mortared area around the top of the chimney; mortar joints which leaving holes and admit water; Leaks around flashing, and the roof shingles around a chimney.
Finding a leak on the chimney is made easier with a minimum of two people and three or four is even better. Here are things you will need to prepare and to pinpoint the chimney leaks:
• Have two cell phones, or one cell phone and a cordless phone, or a couple little walkie-talkies to maintain contact between the person on the roof and the observer in the house. Sometimes yelling isn’t very effective from inside an attic or under a ceiling.
• One or two water hoses with shut-off nozzles on the roof.
• A roll of clear plastic long enough to wrap around the chimney several times.
• Good shoes and safety harnesses for people on the roof.
• A yellow lumber crayon
Chimney Leaks
Once you’ve assembled the items you’ll need, and then follow these step-by-step instructions:
1. Wrap the chimney with plastic all the way around to a point about 18 inches up, starting from about 1/2 inch above where the chimney meets the roof. While leaving the flashings around the very base of the chimney exposed, cover the chimney bricks.
2. Run water from the hose down the roof along the lowest side of the chimney, with a person stationed in the attic (or inside the house if the attic is inaccessible) watching the ceiling. Before moving it, run the water for two minutes in the same spot. Don’t direct the water up under the base flashing or splash the water up on the chimney. Have the observer in the attic report the very first drop of water seen. Use the yellow lumber crayon to mark the spot where the hose was pointing at the time, as soon as water is reported. Mark the spot firmly since water or rain will fade the lumber crayon quickly, because it may be several days before the repairs are done.
3. Move the water one shingle at a time up along the side of the chimney, if there is no leak on the front, or low, side of the chimney. Always run the water downhill. As you move up the roof shingles on that side of the chimney, pause at least one minute at each shingle, but don’t let the water get behind the chimney yet.
4. Repeat the process on the other side of the chimney, one shingle at a time, if there is no leak there. If you do find a leak, stop and mark it, but continue to look for others above if you can do so without further interior damage. Poke a hole in the center of the wet spot and let it drip into a bucket underneath, if water is gathering on the ceiling drywall. Before moving along to another surface, let the drywall fully drain.
5. Go to the back of the chimney and repeat everything, if neither side leaks. Do not get water on the vertical chimney surface yet. If there are no leaks up to this point, it means the leak is higher than the base flashing or nearby roof shingles.
7. Remove the plastic wrap and reapply it so the bottom edge is just above the uppermost piece of counter flashing, which is the vertical pieces of metal. Wrap the chimney just above the point that flashing enters the bricks. The plastic is to make sure water is not accidentally sprayed higher than it should be, which would defeat the purpose of the careful search.
8. Run water around the chimney while the observer keeps watching for a leak, starting at the front and then working the sides and finally the back section. The leak must be confined to the mortar joints, bricks, or mud cap if none is found.
9. Next, remove the plastic and begin working your way up the chimney, until you find the leak, keep repeating the pattern of water application on each brick course. If there is no sign of a leak at this point, then you’ve traced it to the mortar cap. Apply water there to make sure.
This process is quite thorough but it is tedious and time-consuming. You’ll know where the leak is when you finish doing the steps above.
